When we travel, I often use more than one camera. I almost always use my smartphone, and then sometimes I use a GoPro, and sometimes I use my DSLR camera. My phone always has the correct time, but sometimes the other two are incorrect. Most recently, on our road trip from Darwin to Perth, I forgot to change the time on my DSLR to Australian Central Time until after the first day, that meant it was half an hour out. Then when we crossed the Western Australia border, I forgot to change it again, putting it out by another hour and a half.
Changing the timestamp manually on each photo is a huge headache, especially when there are hundreds of them. Fortunately, Adobe Lightroom includes a tool that can bulk update your photo time stamps in three different ways. Perhaps the most useful of those ways is a bit confusing though. So let’s update our timestamps and explain what each option does!
Open the Timestamp Update Tool
The first steps to open the timestamp update tool are the same for all three methods.
- Open Adobe Lightroom
- Navigate within your library to the folder containing photos that need updating. Make sure you stay within the library tab and that you are not in the develop tab.
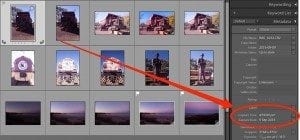
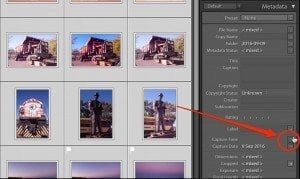
- Select one photo and have a look at the metadata on the right. You will see the timestamp with a little button beside it. Take note of the time and how much it needs to be changed by (e.g., -1 hr or +2.5 hrs).
- Select all the photos that need updating by the same amount and then click the button beside the timestamp in the metadata.
Now you will see the three options for updating the timestamp:
- Adjust to a specified date and time
- Shift by set number of hours (time zone adjust)
- Change to file creation date for each image
So how do they work?
Option 1 – Adjust to a specified date and time
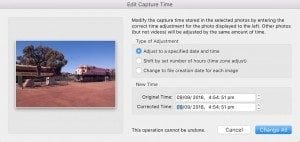
This option lets you modify the photo time stamps to a particular time. Now, just from the name, it sounds like if you were to mass update multiple images, it would set them all to be the same date and time, but that’s incorrect. The way this method of updating works is that it looks at the first image in your selection. It shows you the current date and time, and then when you set a new date and time for it, it looks at the difference. Applying that time difference to each of the selected photos allows Lightroom to maintain the integrity of the timestamps and you keep your photos all in order.
So let’s say you are moving the first photo forward 3 hours and 42 minutes. Each following photo in your selection will then be moved forward 3 hours and 42 minutes as well. This option allows you to change every photo by unusual time amounts, for example, if your camera is out by 3 hours and 42 minutes, just a few minutes, or even a few days.

Option 2 – Shift by set number of hours (time zone adjust)
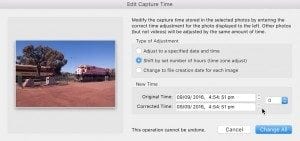
The second option is the one that makes the most sense when you travel across time zones and forget to update your camera time. You just select the number of hours to go forward or backwards from the drop down list. That’s it. Lightroom then adjusts every photo selected forward or back the set number of hours.
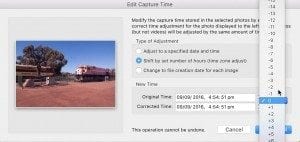
The only problem with this option is that some time zones are only a half hour apart. This option only allows you to change photo times by hourly amounts. So when you have a half hour time zone to change you need to use option 1 and change the time by a half hour that way instead.
Option 3 – Change to file creation date for each image
This option is questionably useful in my opinion. It is perhaps best for resetting your metadata. The way it works is by looking at the creation date of the file which can be different to the timestamp in the metadata. Usually, this will be the photo capture time and date, so assuming that is correct, you can reset your photos to that time and date by using this option, say if you incorrectly updated their metadata timestamp.
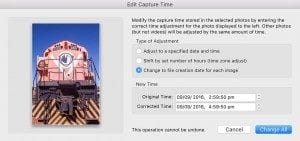
The caveat here though is that the file creation date isn’t always correct. Your camera date may have been wrong anyway, or the file creation date may have changed in the past. There is always that occasional irksome file that has been transferred between different computers and says it was created on a different date to the actual capture time.
That’s it
So that’s it, those are the three options for bulk updating your photo timestamps using Adobe Lightroom. If you need to see it in action, I’ve put together the video below where I used the first option to update all the timestamps on my photos by 1.5 hours following a time zone change. I hope you find it helpful, and if you do, please share this blog post or my video!

