![]() Arq Backup provides a simple backup solution for your Mac that can run in the background, constantly keeping your important files backed up to your choice of cloud storage platform. It encrypts your files locally and regularly backs up your changes when you are connected to the internet. Since it is merely a tool that connects to your choice of storage provider it gives you a lot of flexibility to handle your backups as you see fit to provide the greatest level of control and redundancy. The quickest and simplest solution that provides a low-cost cloud backup option though is Amazon Drive, so I’ve chosen to use it for this tutorial, but you can connect to other cloud storage providers in very similar ways.
Arq Backup provides a simple backup solution for your Mac that can run in the background, constantly keeping your important files backed up to your choice of cloud storage platform. It encrypts your files locally and regularly backs up your changes when you are connected to the internet. Since it is merely a tool that connects to your choice of storage provider it gives you a lot of flexibility to handle your backups as you see fit to provide the greatest level of control and redundancy. The quickest and simplest solution that provides a low-cost cloud backup option though is Amazon Drive, so I’ve chosen to use it for this tutorial, but you can connect to other cloud storage providers in very similar ways.
Let’s get started.
This tutorial assumes you already have an Amazon account with an active Amazon Drive trial or subscription. If you don’t, go to https://www.amazon.com/clouddrive to start a free trial or subscribe.
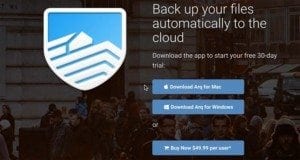 Download Arq
If you don’t already have it installed, then your first step is to download Arq. To do this, go to www.arqbackup.com and download it. You can do this by clicking “Try Arq For Free” and then click “Download Arq for Mac”.- Install Arq
Once the download completes, run Arq.dmg and once the Arq Installer window opens, double click the Arq icon to begin the installation. When it asks you if you are sure you want to open it, click “Open”. It will then ask you to enter your computer password to confirm. This is not getting sent to Arq or anything like that, it is just your local computer making sure it is ok to run the application. The installation itself will then happen and the Arq application will appear. 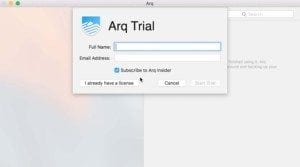 Licensing
A license information dialogue will appear where you can view the license agreement and then either agree to it or quit. Click “Agree” to proceed. By default, it will then present you with the Arq Trial. Enter your name and email address, then click “Start Trial”, or if you have a license click “I already have a license”. It will give you a box to enter your serial number.- Choose your backup destination
The next dialogue to appear will ask you to choose your backup destination. Amazon Cloud Drive has been the default every time I’ve installed this, but if not, select it from the list then click “Log into Amazon Cloud Drive”. - Setup Amazon Cloud Drive connection
You will be shown a window with the Amazon login screen. Enter your Amazon Drive credentials in order to log in. Click the “Keep me signed in” box if you wish to remain signed in. 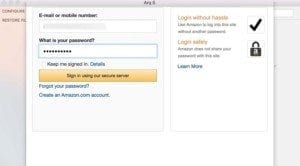 Setup backups
Arq will authenticate your Amazon Cloud Drive credentials, once successful, it will ask you what you want to do first, either setup backups or restore files. Click “Setup Backups”. You will be asked for an encryption password. This is a completely new password that is used to encrypt your backup files. Only you will know this password, so if you forget it you will not be able to restore your backups. With that in mind, make sure it is something secure but also something that you will remember, or write it down somewhere safe. Once you have settled on what password you will use, enter it twice to confirm it and click “Continue”. Then click “I Wrote It Down” to confirm you have the password somewhere safe and acknowledge it cannot be retrieved if you haven’t.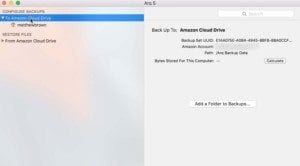 Add folders to backup
By default, once you enter your encryption key, Arq will automatically add your Mac home directory to the backups. Depending on how you use your Mac this will include pretty much all your files already anyway. It includes everything on your desktop, in the default music, video, photo and document folders. You can, however, add more folders as you please. This is especially important if you want to backup folders outside that home directory or things on external drives. To add new folders, click “To Amazon Cloud Drive” from the left backup tree. On the right, your Amazon Cloud Drive backup information will appear and you can click the “Add a Folder to Backups” option. From the dialogue that appears you can then select the folder you want to backup and click “Open”. You could select an entire external drive for example. It will then appear in the list of folders being backed up to Amazon Cloud Drive.- Begin backing up
If you left all your settings as default, Arq will begin your backup on the next hour. So for example, if it is 1:20pm, your backup will begin at 2:00pm. You can, however, force it to start immediately by clicking the Arq icon in the menu bar and selecting the “Back Up Now” option.
Once your backups have begun you will be able to see information about them in the Arq window and from the menu accessible by clicking the Arq icon in the menu bar. You can also now close the Arq window and rest assured that your backups will continue to run as long as the Arq icon is in your menu bar.
I hope you’ve found this helpful. I’ve also done a video tutorial that you can watch here:
[tg_youtube width=”” height=”” video_id=”IFW6FWPA80s”]

